Daggerboard construction

August 13, 2016

For a long time I thought I was going to make the daggerboard in the same way as the rudder. So, with the aid of a mold. To which I have just postponed that for some reason. But at the finish of the main hull the appropriate daggerbord case slot must have been created. A good reason at last to make that daggerboard.

I made it almost according to the plans, so with a Western Red Cedar wooden core. But to prevent this core against water penetration in case of a collision with an UFO, or hitting the ground, I made two changes to the plans. First a leading edge with a high density glass fiber core behind, instead of the wood, and second a bottom part with a foam core. In addition to these changes and for structural reason I replaced the wooden core in the leading edge by a glass fiber core.

Photo’s are better than explaining by words. You can find them here.

Enjoy the animated gif of the infusion of the daggerboard.

Daggerboardinfusion_450


Routine chores.

December 7, 2014

Making composite panels out of 1220×2440 (4’x8′)  foam sheets is an ever returning job. I make all bulkheads and interior panels always in the same way. This is the double layer vacuum infusion system where both laminates on each side of the foam core are infused simultaneously. Working alone it takes me about 3½ hours from start to finish including cutting the materials and preparing the vacuum bag.

Dsc00188_450

In the above image the resin flows from left to right and is halfway the panel. This is relatively simple to do once the principles are understood. However, the devil is in the details and the best way to get it right is to buy my Vacuum Resin Infusion Starters Kit in which the procedure and required materials are fully described.

RI Starters KitBut there are more vacuum based recurring chores, for instance making rounded edges. I use a lot of them, on the outside, like the front edge of the cockpit seats in the image below, or on the edges of interior panels.

Dsc00184_450

By the way, this is not the finished cockpit coaming but the flanges for the cockpit seat back. Anyhow, the rounded edge starts with a partly cut PVC pipe.

Dsc00196_450

The glass fabric for the outer laminate is laid in the pipe.

Dsc00199_450

From left to right, the pre cut foam strips, trapezoidal shape inside smaller than outside width, green bleeder and release film, peel ply, inside glass fabric, the pvc pipe mold,  groomed vacuum bag with one side attached to the mold and at the right two at an earlier moment made half foam tubes.

Dsc00201_450

Foam strips placed with micro bog.

Dsc00202_450

Now ready for the vacuum bag.

Dsc00203_450

Vacuum bag almost closed. This is the tricky part because any resin on the sealant tape will spoil the fun.

Dsc00204_450

Finished and under vacuum, waiting for the cure.

Dsc00205_450

Detail of vacuum tube connection.


Deck laminate and vacuum infusion, final episode.

October 17, 2013

I got help from a young colleague and he was able to close enough leaks to get some pressure so I could find the rest of the leaks with the ultrasonic leak detector. It took me the whole Saturday to finish with an absolute pressure of 260mbar and a 100mbar pressure drop per minute. Very disappointing and it brought me to the end of my rope. Time for a good night rest and thinking about a plan of attack for the next day (Sunday) My goal remained to finish this infusion at the end of the weekend, it has to happen.

Inside leaks

Inside leaks

After a good night rest we went to the workshop together with my wife and son who will help me with their good ears to at first resolve the still remaining leaks and second to assist me with the infusion.

Auxiliaries

Auxiliaries

There are two suspicious spots. At first the bottom of the deck hatch, it looks like it is sort of porous. I cannot find the leak but can hear the flow of air. Now this is in the direct vicinity of the vacuum port and I decide to accept it this way. Second is the beam flange at the port side. It is the same area where I had problems with air leakage during the infusion of the hull bottom, despite my precautions I’ve taken in this area. It seems to be not enough so I decided to open the bag and to try to make some repairs with tacky tape. The air leakage is coming from inside but there it is not possible to locate where it comes from. After the bag has been closed – not an easy job – it appears that the repairs are not of much help and it seems like the air leak has moved. In a last attempt I opened the bag for the second time to paste a piece of vacuum film onto the beam flange. It is the last attempt, the vacuum bag would not survive a third time. Now there is a little improvement, but it is still leaking somewhere. I decided to accept it and inserted an infusion needle in a strategic position through the bag and into the peelply. I connected a vacuum tube to the syringe with the intention that this by-pass sucks the unwanted air directly so that this air cannot pass through the laminate.

Repairs and by-pass infusion needle on beam flange port side

Repairs and by-pass infusion needle on beam flange port side

With these two spots of air leakage a high vacuum level is not possible anymore. Normally in my infusions this is an absolute pressure of around 25 mbar. For the rest of the bag I am pretty sure I did all the possible things to get an airtight bag. However, there is still a 100mbar pressure drop and we cannot find the source of it. Very frustrating.

Vacuum pump and resin traps set up

Vacuum pump and resin traps set up

I decided to start the infusion and to use the the resin flow to detect the leakage. Well, after opening the valve, that was not necessary anymore. Immediately I saw a lot of air coming through the ballvalve into the resin tube. Thus the valve and/or the connection between valve and tube was the malefactor. A little bit of tacky tape around the valve and tube and the whole problem was resolved. Wow, what a stupid detection. This leakage was to big to be detected by the leak detector and I had forgotten to ask my wife to hear for leakage around the ballvalve.

Air leakage ballvalve repaired

Air leakage ballvalve repaired

From now on the rest of the infusion went flawlessly without any air and with an absolute pressure of only 115 mbar due to the other two harmless leaks. Quite a relief.

While the auxiliaries went home I kept control over the cure of the resin till it was sufficient gelled to leave it alone.

Succesfull vacuum infusion

Succesfull vacuum infusion

All in all, despite the bad start, and a small incident with a collapsing resin trap, it was again a successful infusion.

Collapsed resin trap (my own fault)

Collapsed resin trap (my own fault)

And I made a youtube film of this succesfull event. Enjoy 🙂


Deck laminate and vacuum infusion.

September 30, 2013

Finally it is time to finish the final structural part of the main hull. This is also the last big vacuum infusion. After this the hull is structural sound and finished except for the final post curing. It is a big bag of 12x6m and the infusion strategy is again a simple straight forward setup with just 4 single vacuum ports and a resin feeder line going all around. At this moment the vacuum bag is ready but still not airtight. the leaks are still to big so I cannot hear them and because of my bad hearing I need some help with this (read younger ears 😉 My goal is an infusion next weekend. To be continued.

An impression of the latest progress:

First layers of glassfibre

UD reinforcements

Peelply and release film (blue)

Resin distribution mesh (green)

Finished and prepared for vacuum bag

Finished vacuum bag, waiting to resolve last leaks.

More photos in this gallery.


Aft cabin and cockpit construction.

April 4, 2013

With respect to the vacuum infusion of the deck there is a natural separation between the deck and roof of cabin and aft cabin, as a result of the aft beam construction. So it is not necessary to infuse the whole deck at once and therefore I have decided to first infuse the aft cabin roof so I can finish the construction of the aft cabin and cockpit.

To get some more room in the cockpit I made the seats 175cm long (my body length) instead of the 168cm in the plans. (for nice romantic sleeping under the stars, etc, etc.) After the mounting of the aft cabin hatch it turned out that I’ve been a little too enthusiastic with the lengthening of the cockpit seats. To make the hatch fit I had to make a cut out in the bridge and that just didn’t look very well. The other option, positioning the hatch more aft, is not desirable because of the position of the main sheet track. Repositioning the latter results in less pushing force in the boom to help mast rotation so the mainsheet track dominates the position of the rear of the hatch. To resolve this I’ve added two extra foam panels to the front panels of the aft cabin which resulted in a correction of 32mm, which is just perfect.

Oh well, it seems you shrink as you get older.

Click for picture gallery


Update timelapse video workshop webcam

January 21, 2013

And I did some more vacuum infusion, like the aft cabin deck and the V-berth bottom for in the bow.

Vacuum infusion aft cabin deck

V-berth bottom


New vacuum equipment.

November 5, 2012

Good vacuum equipment is the key factor for a successful infusion and this is certainly the case for larger parts. I am a very happy user of the professional Vacmobile vacuum equipment and since the introduction of the new 2S Modular Vacuum System my “old” 20/2 system was eagerly waiting for a new project. See the introduction of the 20/2 in this post.

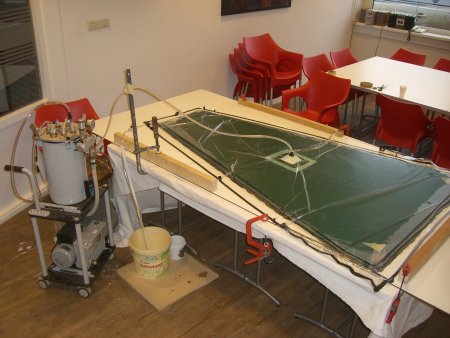
Last week my 20/2 machine found a new home in a very nice building project of a Schionning designed G-Force 1500C catamaran.

This transfer gave me the opportunity to receive the Vacmobile modular 2S System, equipped with the PVR EM28/B vacuum pump with a capacity of 28m3/rh (16.5 cfm) and a vacuum level of at least 20 mbar. For the best possible versatility the RT19 resin trap is provided with eight vacuum connections, 3×1/2″, 3×3/8″ and 2×5/8″

Vacmobile Modular 2S System

The first test run gave me an absolute pressure of 15 mbar (which is very good for such a big machine) and a vacuum drop of only 2 mbar after 24 hours. Impressive numbers!

I’m ready for the next infusion 🙂

Please go to the website of Vacmobiles where you can find an extensive explanation of this outstanding equipment together with detailed specifications and benefits.

Apart from that, I have to mention some striking details for me as end user:

– First of all the very promptly shipping by Fedex, in just three days from New Zealand to my workshop in the Netherlands.

– The package of the equipment is outstanding, very sturdy and well thought out. I can recognize a labor of love.

– It is a really ready to use out of the box system for the normal 220V 50Hz power supply in our country.

– Some very smart details in the resin trap, such as the high integrity vacuum connections, the silicone rubber guide tubes to reduce resin spatter, a resin contamination only to disposable surfaces such as the disposable clear PVC shield that protects the glass view port, the easy removal of the trap lid by two quarter turn twist-lock handles and a vacuum pump connection on the side of trap body, not on trap lid so the pump connection is not disturbed when trap lid is removed.

– And not to forget a small LED torchlight for a watching eye on the resin level in the resin trap (detail!)

– In my personal view the whole system excels in craftsmanship and durability.

Please drop me a line when you want to see the 2S system in action. There are some possibilities in my workshop or by assisting you as primary or secondary system for your own infusions.


Cabin windows and deck hatches.

November 4, 2012

Sorry there were no updates for a while. It is just a lack of time on my side. But also I have to confess that my focus on the project was a little low lately. Progress is still going on, but too slow and I’m afraid I cannot do anything about it due to other obligations, business as well as private.

Anyhow, I’ve started the work around the cabin windows. The design calls for screwed down windows, but I don’t like that solution. Instead I want to glue them in a rabbet. The outside of the window is then about flush with the outside of the hull. Determining the size of the intended windows, also a little different from plans, was a challenge to get it right. Finally I found out that I get the best appearance when the length halfway the height of the window is about the same for all three windows.

Click for photo galery

The intended glazing material is still under consideration. The choices are polycarbonate, acrylic or tempered glass. The windows are curved in two directions and I prefer to make them pre-curved instead of pressing them in the right curve. So, first thing is to make a mold with the right curve in it. I did this by infusing a sandwich panel against the outside of the cabin wall. So far the easiest part. Next is depending on which glazing material will be used …. to be continued.

Click for photo galery

For the deck hatches I choose for the more difficult option of flush hatches, which I found in Lewmar as the most economical ones. I like fresh air and lightness and ordered one size 60 in the fore deck, two size 10 in the head and opposite passage way, two size 30 in the cabin roof and one size 54 in the aft cabin. Flush with the deck means also a water drain below the deck and that will be the next challenge to resolve.

Oh yeah, our vacation was great. To get an idea about canal boating click in the picture below.

Click for photo galery


Unzipped and reason for satisfaction

January 28, 2012

Again an excellent result with perfect quality.

Click to enlarge in photo galery


Another Milestone

January 23, 2012

I can say I now have a lot of experience with making airtight vacuum bags. As a matter of fact, within this project this is big hull vacuum bag number 9 and I thought it would be a piece of cake. After all, it is not just a vulnerable foam hull but a foam hull with an airtight internal laminate. And the joins of the Port and Starboard halves are covered with a glass tape. So no worries about air tightness. I thought ……..

After some more changes in the bag and improvements of the hull integrity in the past two weeks it had to happen.

Last weekend, despite the fact the vacuum bag was still not perfect the infusion started at 3.00 PM in the afternoon. There were a few precautions taken to be able to solve possible problems during the infusion and this has worked out satisfactorily. Only the end counts and despite the troublesome preparations it was again a success, a big relief and another milestone in the project. After a evening and night watch during the cure of the resin I went home at 5.00 AM the next morning, tired but with a good and happy feeling.

Click in the video to see how it went.

Furthermore I made a new photo galery in www.fram.nl with the flow prediction simulation and photo’s of the resin infusion process. Please click here or in the simulation image below.

Click for more simulations and process photos