I assemble my service battery from eight LiFePo4 cells of 3.2V 300Ah. To charge them for the first time, I use a lab power supply and set it to a constant voltage of 3.65 volts.
I have two power supplies of this kind, one with a maximum current of 40A and a smaller one that can deliver a maximum current of 5A. I start with the larger one for each cell, and once the current drops below 5A, I switch to the smaller one to complete the charging until the current is almost zero.
After filling all cells in this way, I connect them in parallel to create a massive battery of 3.2V and 2400A. It undergoes another charge with 3.65V until the amperage is almost zero again.
Once that is done, I assemble the battery by connecting the cells in series, resulting in a 24V 300Ah service battery.
All in all, this is a lengthy process spanning several days during which I don’t leave the battery unattended, and I record the current strength every hour.
To avoid twiddling my thumbs during this time, I’ve worked on my website again. See next post.
Travelers, in the plural, and I don’t mean the travelers among us, but the structures for the mainsheet traveler and self-tacking jib. Both of them gave me a bit of a headache.
During the construction of Fram, I was convinced that I would create a round mainsheet traveler. The radius would be approximately the length of the boom. Therefore, the aft deck is also equipped with high-density foam in the right place and in the right shape.
However, the more I thought about it, the more I began to dislike the idea due to its complicated construction and the additional costs, especially when the benefits were only marginal.
Several multihull sailors use a relatively simple system in the form of a double sheet in the shape of an inverted “V”, also known as an “Oceansheet.” . For a long time, that seemed like a good option, especially because it’s relatively easy to implement. However, I saw on one of the F36 trimarans how the laminate deformed at the location of the blocks. The forces on such a single point are very significant, and the deck needs to be further reinforced in that area. Well, I didn’t really want to deal with that either, and an “Oceansheet” also has its drawbacks.
Long story short, I ultimately chose a traditional mainsheet traveler, and I recently made the base for it. You can read a detailed report about it on my website. The construction is still without the Ronstann series 30 track. I will add these later.
The traveler for the high aspect jib was also a bit of a challenge. From the outset, I wanted, among other things, to have a self-tacking jib. One of the great advantages of a trimaran is that it is more than an excellent sailboat concept, you could say it’s a sailing machine. In order to fully exploit that as a short-handed crew or solo sailor, the systems must work perfectly and be easy to use. Tacking frequently in narrow waters becomes child’s play with it.
Ian Farrier has provided such an option, but he associates it with the need for a centerboard. A daggerboard, in his design, protrudes above the deck and in front of the mast. Right in the place where a self-tacking jib’s traveler track is normally positioned. A centerboard does not extend above the deck and thus does not obstruct the traveler.
For me, the advantages of a centerboard do not outweigh the disadvantages. That’s why I consciously chose a daggerboard. I solved the “problem” of the daggerboard protruding above the deck by placing the jib’s traveler track in front of the daggerboard case. To ensure this doesn’t compromise a smaller jib, I equipped it with a boom, a “jib boom,” in other words. In fact, this makes the trim options for the jib the same as those for the mainsail.
Another option could have been to widen the space just in front of the mast step by making adjustments to the mast step and the head of the daggerboard. I didn’t want to do that, especially since I want to experience the practical benefits of a jib boom.
The downside to the jib boom is that it does make the foredeck a cluttered and unsafe place to be, but I ensure that I don’t need to be there and can trim everything from the cockpit. In addition, I ensure that the boom can be well controlled under all conditions with the jibsheet, topping lift and the traveler control lines.
I carried out the construction parallel to that of the mainsheet traveler, and the structure is the same, although lower and narrower. The Ronstan Series 30 track is 2 meters long. Please click here to jump to the relevant chapter on my website.
From the beginning, it was clear that Fram needed to be placed in a shed again to complete the painting, tidy up the flange around the beam connection with the floats, and make some through hull fittings for water supply to the toilet and watermaker. A triducer for log and depth also needs to be installed.
To perform that work, I found a shipyard nearby where Fram can be stored in an empty boat storage warehouse for three months. I deliberately planned this for the summer since the temperatures are suitable for the painting work during that time, and many boat warehouses are empty in anticipation of winter storage. I carried out the work from July 1st to October 1st 2023, three months of hard work, 10-12 hours a day, and seven days a week.
Another part of the work is the construction of a new mast. For this, I used the mast of a Formula 40 catamaran as a base. I will come back to that later.
Please click on this link to my website where you will find various photos of the completed work.
Over the past year, I have made little progress in further construction of my boat. There were too many distractions, including preparing and carrying out an unforgettable 6500nm sailing trip to the far north. I have reported extensively on this, although in my native language, so you will have to use Google Translate or something similar to make it readable for you. Sorry about that.
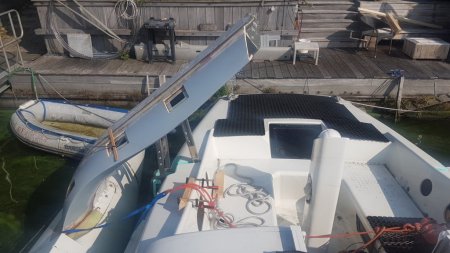
It was my plan to rig the boat this year. For that, I first gave the mast a beautiful mint green color. Unfortunately, that’s where it stopped. Deliveries of the required mast fittings have been delayed so much that it was no longer possible to finish the rigging. The mast is still in a horizontal position over the boat. It is now winter here so it will probably be a few months before the mast is ready and can be set vertically.
On my YouTube channel, you can find a short video of the transport of the mast from the workshop to my house.
My website and this blog, apart from the travel reports, have also been greatly neglected by me. I had already promised to do more with it but yes, busyness and lack of motivation, ensure that the digital reporting of my construction activities is on the back burner. It’s also just a lot of work and it’s also a challenge for me to write it in English.
However, today I discovered ChatGPT. It’s amazing what possibilities it offers, but it’s also a good translation machine that I hope it will make my writing easier for me. This post is the first try 🙂
It should be winter here now. Last week the harbor was still frozen but now it’s autumnal again with a lot of rain and storms. A somewhat dull last day of the year. The temperature is also high for this time of year. More autumn than winter.
Meanwhile, I wish everyone a happy new year with many beautiful sailing days.
Progress on Fram is on hold. New updates to be expected at the end of this year. First action when I’m back from the Arctic voyage is finishing the rig. Last week I’ve picked up the mast. It is a former F40 aluminium wingmast in two parts which I have painted in the Fram colors.
After a long time of no boatbuilding I have started the build of the fairings in front of the beams. I needed some time to reorganize the garage and collect the right tools for the composite work on the beam fairings. Nice to do some boatbuilding again as a good distraction on the interior work.
The fairings are made with 30mm. wide foam strips in female form frames.
I have some remnants of resin and hardener and the first glue job with the foam strips is a nice opportunity to use up al these remains. I pressumed the unlabeled clear bottle is the one with the resin and the small heavily used bottle the one with the hardener. In hindsight a big mistake as the epoxy bog does not want to cure. A better look at the unlabeled clear bottle shows that it is not resin but also a hardener but from another brand and almost odorless.
Da$#%!*, stupid mistake and have to break down the first fairing. Nevertheless much better than a wrong ratio between resin and hardener that leaves behind a sticky mess. This stuff is easy to remove and is is just a matter of waste time.
The trial fit on the starboard front beam is satisfying, however there remains a gap between fairing and cabin.
The plans give the possibility to make a build out on the cabin to match with the fairing. But, as the cabin is already nicely painted I prefer to make a small extension to the fairing with the same goal, a fair match between cabin and fairing and beam.
The still remaining gap between beam, beamfairing and cabin will be nicely closed later on.
By the way, the beams are still covered with peelply and coated with a cheap primer for UV protection.
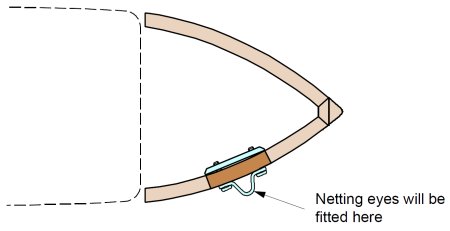
At first I thought of making a tube along the edge of the beam fairing for the connection of the wingnet lashings. But in hindsight it looks better to stick to the plans, meaning netting eyes out of sight in the bottom of the fairing.
This means replacing the regular foam with high density foam at the places of the netting eyes.
…
To be continued with the mounting of the beam fairings against the beams.
Here are much more photos of the making of the beam fairings. Click in the photo gallery.
In an earlier post I told you about my windlass choices. Now that I am finishing the interior it is also time to put the windlass in its final position. For that I have to make the base plate on which the winch is mounted.
My Quick Rider windlass is deliberately delivered without anchor chain guide as I want to turn the windlass counterclockwise. All winches have the anchor chain guide on the other side. So I made the anchor chain guide myself from fiberglass over a mold. The base plate for the windlass has thus become quite a special workpiece.
Of course, the anchor chain locker is closed with a neat door that matches the rest of the interior
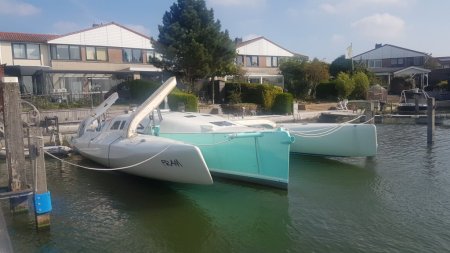
However, I have never been away but I have quite neglected this blog. The last posting about (building) FRAM was already two years ago. Time flies and in an earlier post I said I had to slow down myself. FRAM floats in the private harbour behind our house. Now without any project pressure and external obligations, good for me but bad for the project progress. I escaped the workflow in which I was living. The time I used to spend on building FRAM has been replaced by other things and more social activities. And some other projects, the last one being the renovation of the ground floor of our house together with the building of a new sunroom at the back of our house.
Now that is all finished, I can concentrate on FRAM again.
Compared to previous (too) busy years the progress of finishing FRAM has been very slow. Not only because I enjoy the free time but also that the FRAM project has entered a new phase. She is in the water, there is no workshop anymore and instead Fram’s interior has been rebuild into a workshop. Among the things to do there is also a lot of thinking about the technical installations on board.
Last year I have upgraded the website fram.nl but since then still without publishing any updates. In the past I used this blog to describe some project parts and to announce new updates of the website and that is what I’m going to continue from now on.
My apologies to all followers of this blog who were waiting so long for new posts. I need to do better.
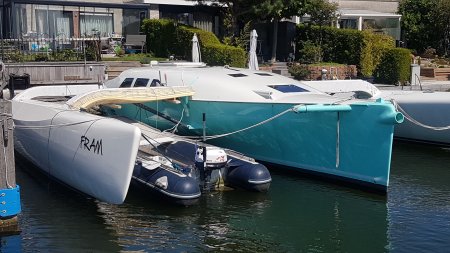
Easter 2018 was a great moment. More than 10.000 building hours has resulted in the launching of Fram. Although she was ready to sail independently, much still needs to be done. The interior has yet to be finished, just like the beams, the technical installations and of course the rigging. Fram is now floating in our backyard which makes it more comfortable to do most of the remaining jobs.
Click here for an extensive photo report of Fram’s move from workshop to her home port.


 Posted by Fram