Bow wing and anchor gear

June 2, 2014

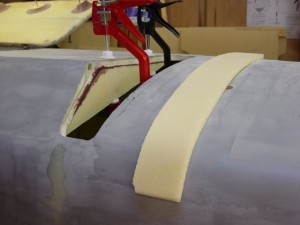
The plans call for an 75 to 80mm fiberglass or carbon tube for the bow wing. Instead of buying such a tube, I made the tubes myself the easy way, with a foam core (rounded 5 layers of 15mm Corecell)

Already at an earlier stage, I decided to refrain of the designed anchor locker in the bow. The bow is the worst place to stow a lot of weight, and no locker gives much more interior space. Besides of that, I’m tired of bringing the anchor home by elbow steam so I decided to mount an electric windlass and the combination with the designed anchor locker is not a logical one. It is best to bring the weight of the windlass, chain and rope as far aft as possible. Just in front of the forward sub beam bulkhead is ample space to create a large chain locker and the same space gives also the opportunity to bring the windlass below deck. The consequence is a chain pipe through the deck between bow wing and windlass locker.

An investigation into windlasses taught me that the vertical type is the most suitable for my application . This is because of the space available in the windlass locker and the improved 180 degrees grip on the gypsy with respect to a 90 degree grip on the gypsy of a horizontal winch. An unforeseen problem occurred when I discovered that most vertical windlasses turn clockwise when hauling the anchor. Because the winch will be mounted on the starboard side means that the chaintube comes too far to the outside of the bow wing and the chain must go downwards along the wall of the chain locker. That’s not a good setup and I would rather saw a winch that turns counterclockwise at hauling of the anchor. Now all winches can turn both sides, but it is the chainpipe that is fixed on the port side of all vertical windlasses . Only the brand Quick offers a left and right version, but unfortunately only for the larger types (Regal, Dave, Duke). However, the smaller Rider model comes without a chain pipe and an email to the Italian manufacturer confirmed me that I can make a DIY solution for the chainpipe on the starboard side of the windlass.

So I purchased the Quick Rider R3 1000W 24V with 8mm/14mm chain/rope gypsy.

Next question is which anchor to use. I’m familiar with CQR, Bruce, Danforth, FOB and Fortress anchors but the new generation anchors appears to be superior to these traditional models. The various tests prove that Spade and Rocna are the best performers and with regards to their seizing guides I need an anchor with a fluke surface of about 1400 sq.cm, which is a Spade S140 or Rocna 25. A nice feature of Spade is that their 140 model is also available in an aluminum lightweight version.

With their 1:1 patterns I made a wooden mock-up of both versions to determine the possibilities for stowing the anchor on the bow wing. The length of both anchors are about the same but the height of the Rocna 25 is much less than the height of the Spade 140. Last but not least, the Rocna is considerable cheaper than the Spade and the lightweight Spade is far beyond my budget.

So I purchased the Rocna 25. More pictures are on my website.

By the way, the knowledge base of Rocna is worth reading.


Finishing the final details on the second float.

January 2, 2006

In this album the completion of the second float. Post curing, wingnet lashing rail and the hatches.

Final contruction details


DIY Resin Infusion Starter Kit.

January 10, 2005

Apologies to all who were waiting for so long for an update. What happened? Well, nothing actually. Have been busy with other things, so progress is not what I wanted it to be. The actual stage is that this first float is ready for final painting. What happened more:

This site is very popular and I’ve got so many questions about vacuum infusion, that I decided to make a do-it-yourself package for the builder who wants to do resin infusion also. With this package one can start with a test panel and going on with other parts, without the beginner failures, just the right injection method from the beginning! Click on the link or the CD-picture below to learn more. 

DIY Resin Infusion CD

Do-it-yourself Resin Infusion Starter Kit now available
!!Try it, you won’t regret it.

After the summer break (with a nice sail with friends in the English Channel and North Sea), because of a design change I learned how to repair big holes in the composite structure. I received an e-mail from Ian Farrier, announcing that the preliminarily drawings are now replaced by the final design plans, with some minor changes …… One of them effected my job so far dramatic: the new designed beams are much wider and won’t fit anymore between my raised deck area.

Adapt to wider beams

So I had to take the saw for cutting some big holes, really not a nice job. The final fairing was just finished, but on the positive side, due to my sailing holiday I didn’t cut in yet the lashing holes in the molded tube for the wing netting.

Instead of making finally some progress, this winter holiday we went on sailing with a very nice maintained F-27 at the West coast of Florida, owned by Doran Cushing, a real dependable address and to recommend for us North European cold water sailors (and others of course).

Sailing in Florida with a F-27

And for the insight website enthusiasts:
 – the index page is modified to the width of the rest of the site
 – download time has been improved by replacing the java applets menu buttons by smaller .gif buttons
 – the workshop webcam added. When my computer is on, the webcam will refresh every 30 seconds with an actual photo of my workshop.

Webcam

– next to come is compressing the float building pages to one page by the use of more web albums. This also will allow me to publish more photo’s without influence on download times.


Finishing the first float.

May 22, 2004

This photo galery is about the finishing work on the first float.

The wingnet fastening is with an integrated molded lashing rail with a fiberglass tube. Another purpose of this rail is to create three strong deck eyes, as an alternative for bolted SS pad eyes. The extra strength is created by carbon reinforced foam pads, which goes through the hull and are laminated to the inside, the middle one also in the shroud bulkhead.

Also the making of two deck hatches (with invisible hinges) and after all the glassing is done, the final post curing of the whole hull before the fairing goes on.

The fairing and sanding turned out to be a real investment in learning time and finally succeeded by dogged perseverance. It’s the last 300 gram of fairing compound that required the maximum effort.


The making of a tube (attempt)

October 10, 2003

The wing nets are being attached to the hulls with a moulded lashing rail, made out of a tube. To get some experience with this system, I decided to make 3/4″ tubes for attaching a net inside the float, as a floor to store sails and other stuff in a dry and ventilated matter, and not in the keel section of the float. Second advantage is that things are reachable from the deck hatch, without the need for going in.

Although good enough for inside the float, I decided to buy ready made glassfibre tubes for the moulded lashing rail for the wing nets.